Audio
Synopsis
This guide explains the different audio modes commonly found in arcade games and their pros and cons, helping you choose the best option for your setup.
Important notice
Recordings and streams must only be shared privately:
- Through unlisted videos
- In private streams with friends
- Within trusted data communities
Sharing content publicly puts you at serious risk of getting banned from arcade venues and communities. Please respect these guidelines.
Audio modes
TL;DR
| Mode | DirectSound | WASAPI Shared | WASAPI Exclusive | ASIO |
|---|---|---|---|---|
| Latency | Highest | Medium | Low | Lowest when setup correctly |
| Compatibility | Highest | High | High | Low |
| Multiple audio streams | with extra steps | |||
| Audio capture | with extra steps | |||
| Recommended for | Legacy games | Most users | Low latency needs | Lower latency needs |
DirectSound
The legacy Windows audio system, still used by older games.
✔️ Pros:
- Extremely high compatibility, especially with older games
- Multiple audio sources can play simultaneously
- Easy audio capture with OBS, Discord etc.
- Simple to set up and use
❌ Cons:
- Highest latency of all modes
- Being phased out in favor of WASAPI
- Limited audio quality compared to modern modes
💡 Pro tip: Use spice2x's -lowlatencysharedaudio setting to reduce latency.
WASAPI Shared
The modern Windows standard audio mode. Recommended for most users.
✔️ Pros:
- Works with most modern games and applications
- Multiple audio sources can play simultaneously
- Easy audio capture with OBS, Discord etc.
- Good balance of latency and compatibility
❌ Cons:
- Higher latency than Exclusive mode
- Some games may require patches/configuration for Shared mode
💡 Pro tip: Use spice2x's -lowlatencysharedaudio setting to reduce latency.
WASAPI Exclusive
Hardware compatibility notice
Your audio device must explicitly support exclusive mode. Check your audio settings:
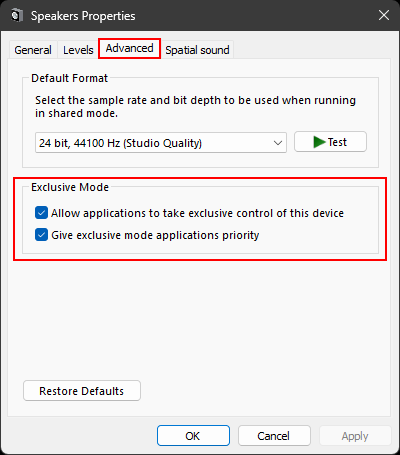
Gives one application complete control over the audio device.
✔️ Pros:
- Significantly lower latency than Shared mode
- More consistent audio processing than Shared mode
- Better for rhythm games if you don't mind the cons
❌ Cons:
- Only one application can output audio at a time
- No audio capture without special hardware/software
- Can cause system-wide audio interruptions
ASIO
Hardware requirements
For optimal results, use a dedicated ASIO-compatible audio interface. Software solutions like ASIO4ALL or FlexASIO exist but have limitations:
- Added processing overhead
- May not improve latency over WASAPI Exclusive
- Mostly useful when:
- Games are incompatible with your audio device
- ASIO is the only supported mode
- You need specific ASIO features
Professional audio standard designed for audio interfaces and music production.
✔️ Pros:
- Lowest possible latency when properly configured
- Direct hardware control
- Precise buffer size adjustment
- Professional-grade audio quality
- Bypass Windows audio stack
- Capture is possible when routed through Voicemeeter at the cost of very little added latency
❌ Cons:
- Requires specialized hardware for best results
- Complex setup process
- Usually limited to one application at a time
- No direct audio capture support
- System performance heavily impacts stability
- May require significant tweaking
ASIO Recording/Streaming
This guide assumes your game already uses ASIO and you want to record/stream with audio
Required software
ASIO bypasses the Windows audio system that recording/streaming applications use, so you'll need additional software to route the audio:
- Voicemeeter Banana - For audio routing
- OBS Studio - For recording and streaming
Install both applications before continuing.
Game configuration
Set your game's ASIO output device to Voicemeeter Virtual ASIO:
- For spice2x games: Look for settings like
-iidxasioor-sdvxasioat the top of spicecfg'sOptionstab - For other games: The location depends on your setup, but look for ASIO device selection
Voicemeeter configuration
First, configure recommended settings:
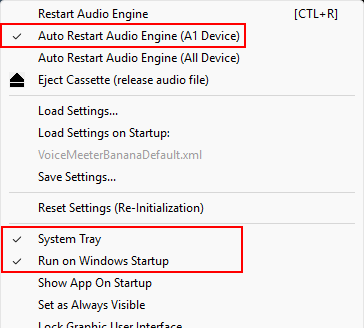
- Click
Menuin the top right - Enable settings shown below to ensure Voicemeeter:
- Starts with Windows
- Auto-recovers from audio issues
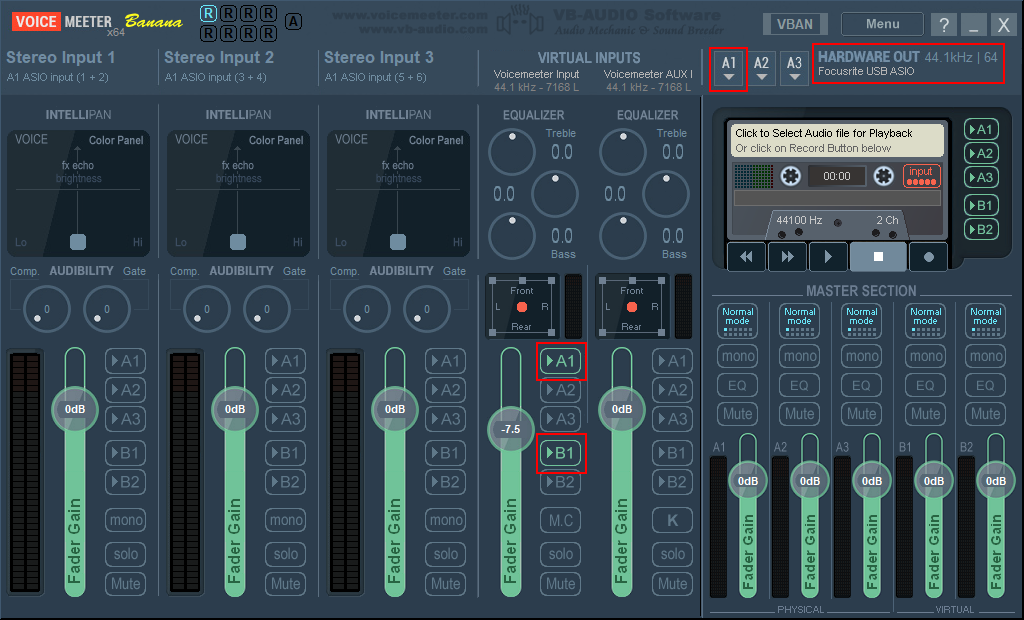
Next, set up ASIO output:
- Click the
A1button in the top right - Select the
ASIO (Steinberg)tab - Choose your ASIO device
Finally, configure audio routing:
- Locate the 4th column in the interface
- Enable only the
A1andB1toggles as shown:
OBS Studio Configuration
-
Run OBS Studio's initial configuration wizard if you haven't already
-
Set up audio capture:
- In the Sources panel, click
+and selectAudio Input Capture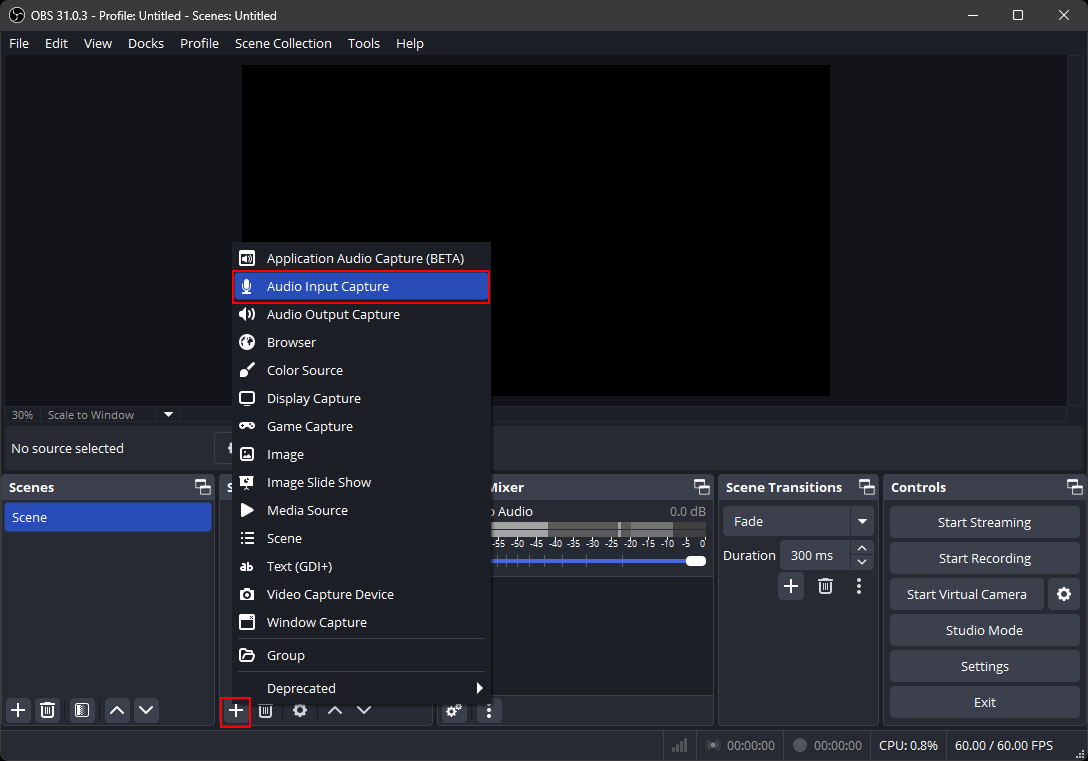
- For the Device, select
VoiceMeeter Output (B1)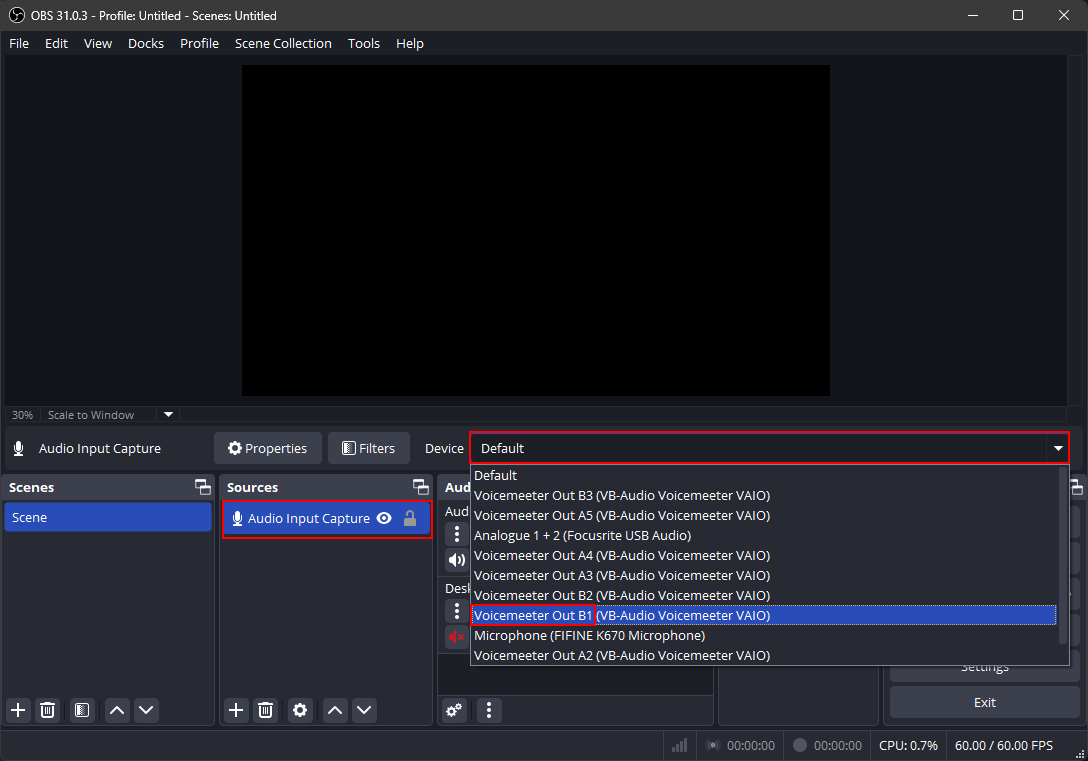
- In the Sources panel, click
-
Enable audio monitoring:
- Click the gear icon in the Audio Mixer panel
- Find your Audio Input Capture source
- Change
Audio MonitoringtoMonitor and Output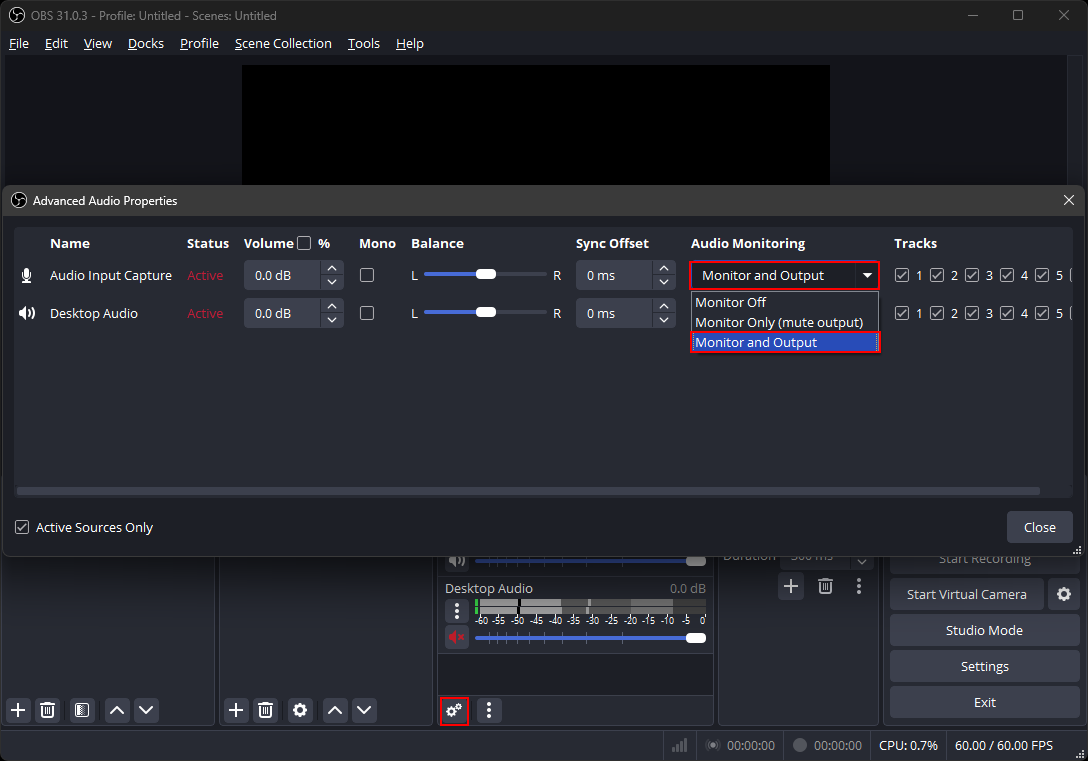
-
Configure OBS audio settings:
- Go to
File>Settings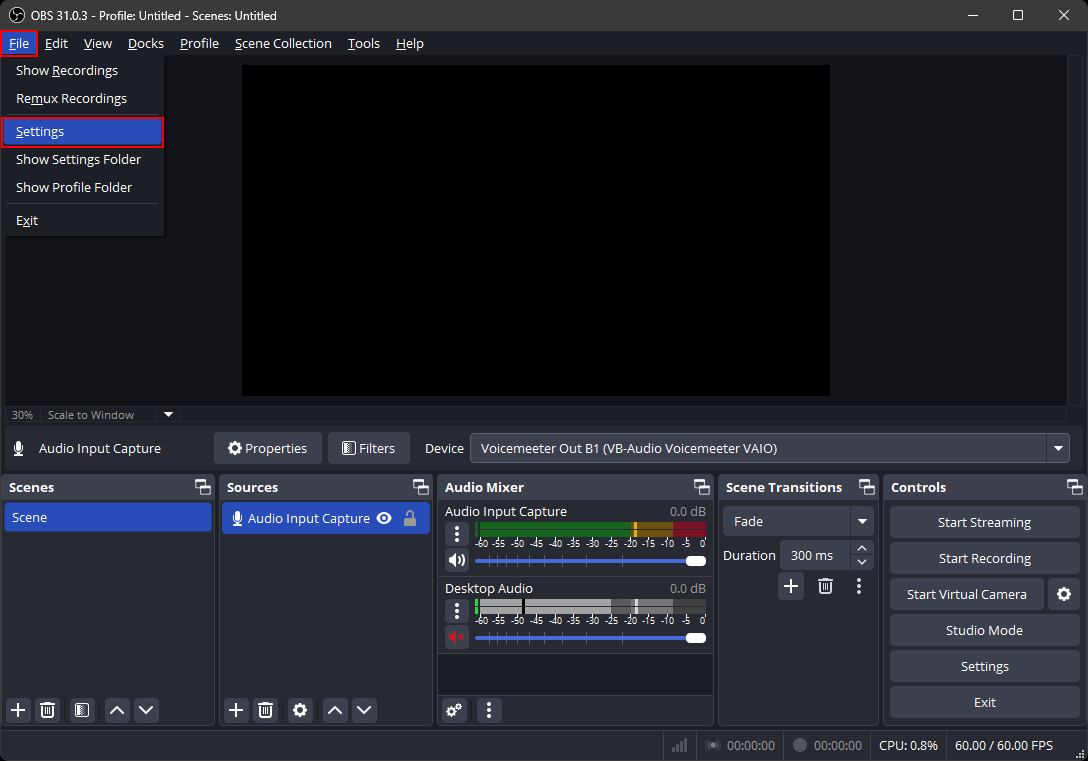
- In the
Audiotab:- Set
Sample Rateto match your ASIO/game settings - For
Monitoring Device, select any unused input such as aVoiceMeeter In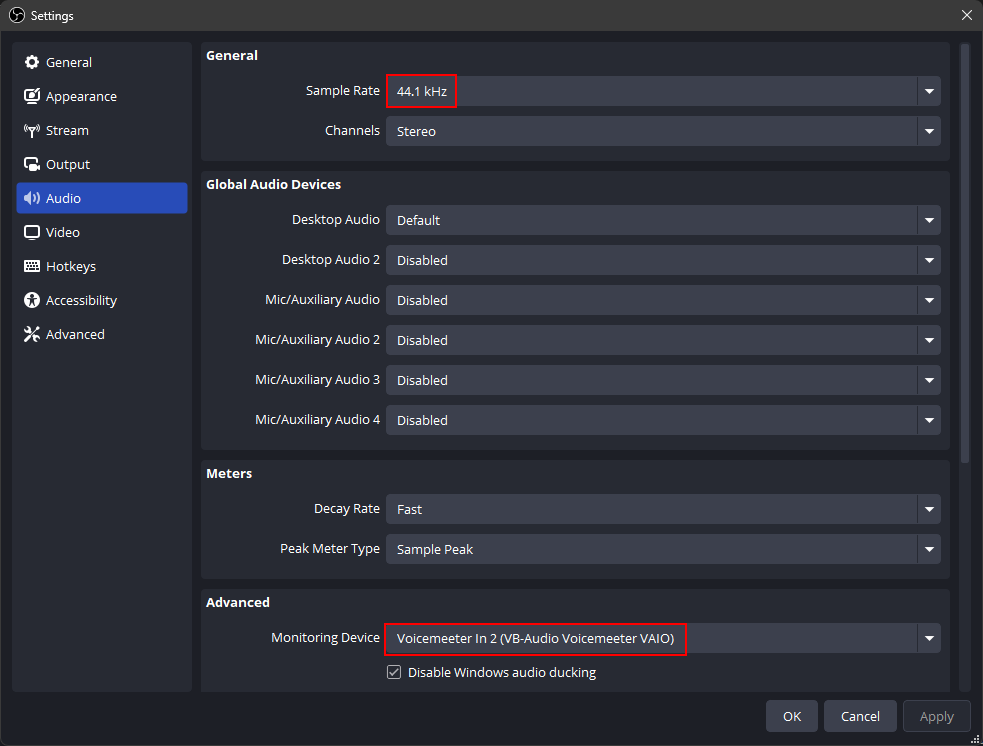
- Set
- Save changes with
ApplyandOK
- Go to
-
Add video capture:
- In Sources, add either
Display CaptureorGame Capture - Adjust OBS video and output settings as needed
- In Sources, add either
Using this setup
First, ensure Voicemeeter and OBS Studio are running.
Next, configure your desired OBS output and video settings.
-
For streaming and recording, now use OBS as normal.
-
For Discord sharing:
- Right-click the OBS preview window
- Select
Fullscreen Projector (Preview) - Choose which monitor to show the projector on
- Press Alt+Tab to switch away from the projector window
- In Discord, share the projector window