![]()
Game Setup
You must obtain clean, unmodified and complete data to proceed with our guides
Corrupted or incomplete files will cause unpredictable issues we can't cover.
TWO-TORIAL does not provide or distribute game data. Do not ask.
If you're coming from a previous version of the game
You'll want to create a new folder for the game and start from scratch.
SEGA games DO NOT like being extracted over old data!
Preparing data
Game data cannot run on E:\ or Y:\ drives, use a different drive letter
Ensure your game files are not marked as read-only:
- Right click the directory containing your files
- Click on
Properties - Under the
Generaltab, findAttributesand uncheckRead-only - Click
Apply - When prompted, select
Apply changes to this folder, subfolders and files - Click
OKto confirm, thenOKagain to close Properties
Here's what the expected original data structure should look like:
Create another empty folder named AppData next to them:
The App folder should have a file structure as follows:
If your data doesn't look like this
If your data looks like the third example:
- Create an
Appfolder and move all files and folders from the image inside of it - Create empty folders named
amfs,OptionandAppDatanext to theAppfolder
If extra directories or files are still present (executables, scripts, etc.), remove them.
This also indicates tampered data, we strongly recommend obtaining clean data from elsewhere.
Updating data
Extract your patch's files to your existing data in a way that matches its file structure.
Agree to overwrite files if necessary.
Installing option data
SEGA games receive content updates through option folders rather than direct game file updates.
- maimai DX JPN(SDEZ): each new release of maimai DX increments the first letter of the Options (ie.
H???for BUDDiES,I???BUDDiES+) - maimai DX EXP(SDGA): Options will always begin with the letter
A(i.eA???) ???represents a sequence of numbers
After downloading option files, extract them into your game's Option folder.
Option numbers don't always follow a sequential pattern
It's common to see the numbers jump, for example H005 then H011
Do not mix option data between game versions
Installing unprotected executables
maimai DX executables are protected and will not run on a regular computer.
- Obtain unprotected (also called "unpacked" or "decrypted" by the community) copies of of the following folders and files:
▶️amdaemon.exe
▶️Sinmai.exe
📂Sinmai_Data
┣━📂Plugins
┃  ┣━⚙️amdaemon_api.dll
┃  ┗━⚙️Cake.dll (JPN/SDEZ only)
┗━📂Managed
   ┣━⚙️AMDaemon.NET.dll
   ┗━⚙️Assembly-CSharp.dll
📝mai2.ini
- Copy all of the above to your data's
App\packagefolder - Agree to overwrite when asked
Assembly-CSharp Notes
Assembly-CSharp.dll must match your game version.
All other files can be reused between game versions.
Installing ICFs
Install Configuration Files (ICFs) tell the game what version it is. Without this your game cannot go online!
If your unprotected executables came with an amfs folder, and already has a file named ICF1 in it, skip this step.
Otherwise, obtain copies of ICF1 for your game version and place it in
the amfs folder. If it is named something else, rename it to exactly
ICF1 without any file extensions.
Showing file extensions
By default, file extensions on Windows are hidden. Enable them by navigating to
the View tab in File Explorer and select File name extensions.
mai2.ini
Ensure that the App\package folder contains mai2.ini.
If this configuration file is missing, create one using the contents below:
Installing segatools
If you already have segatools installed, ensure you're using the latest version
- Head over to segatools releases
- Download
segatools.zip - Extract the archive
- Find
mai2.zipand extract it to your data'sApp\packagefolder
You should now have these files added to your App\package directory:
Configuring segatools
You'll need to manually edit App\package\segatools.ini as segatools has no graphical configuration tool.
We recommend using a text editor with syntax highlighting such as Notepad++.
The following sections match those found in segatools.ini - skip any sections not listed below.
If a key already exists in a section, simply change its value after =, do not add another key.
Relative Paths
Relative paths make your configuration portable and easier to maintain.
Say your game folder structure looks like this:
If segatools.ini needs to access the Option folder, you can use ../../Option/:
../moves up frombintoApp../moves up again fromAppto the rootGame Folder- Then it can access the
Optionfolder
AquaMai
Find more information about AquaMai on their GitHub page.
Also check our Unity modding guide.
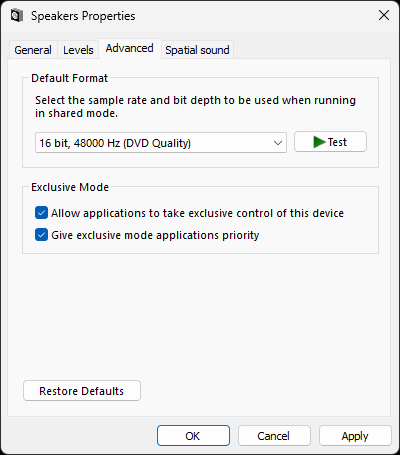
Configuring audio
- Open sound settings
- On Windows 10: Right-click on the volume icon in your taskbar and select
Sounds - On Windows 11: Right-click on the volume icon in your taskbar and select
Sound settingsthen scroll down and click onMore sound settings
- On Windows 10: Right-click on the volume icon in your taskbar and select
- Navigate to the
Playbacktab, right click on your default audio device, and click onProperties - Go to the
Advancedtab - Check both boxes under
Exclusive Mode - Open the
Default Formatdropdown - Pick either
16 bit, 48000Hz (DVD Quality)or24 bit, 48000Hz (Studio Quality), clickApply, thenOK
Connecting to a network
Pick one or the other, not both!
Option 1: Remote (Online Network)
- Head to the
[dns]section insidesegatools.ini - Set
defaultto the address provided by your network
Do not addhttp://orhttps://to the address!
- Then, head to the
[keychip]section and add & setidto the keychip ID provided by your network
Do not change the subnet from its default unless told to by your network!
- Create a file named
aime.txtinsideApp\bin\DEVICEand type in a 20-digit access code
If you don't already have one, simply make one up, just know it must not start with the number 3!
Option 2: Local (ARTEMiS/AquaDX)
Refer to the official guides for ARTEMiS and AquaDX to set up a local server.
Installing VCRedist & DirectX
Download and install:
Before playing
A few things to remember before each play session
- Close of any applications running in the background which could affect performance
- Double-check your monitor is oriented properly for this game
- Double-check your sample rate is correct for this game
- Connect your controller
First launch
Without an English patch, the service menu will be in Japanese.
If you don't know Japanese, Google Lens is a handy tool for navigating this menu.
If you've followed all instructions correctly, you're now finally ready to launch the game!
Start the game by running App\package\launch.bat. Let the game load until you reach a screen with the message below.
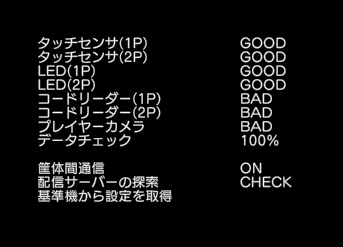
Press your Test button (default F1) to enter the service menu. Use the Service button
(default F2) to navigate the menu, and Test button to select an option.
Navigate to ゲーム設定 (GAME ASSIGNMENTS, the 7th option).
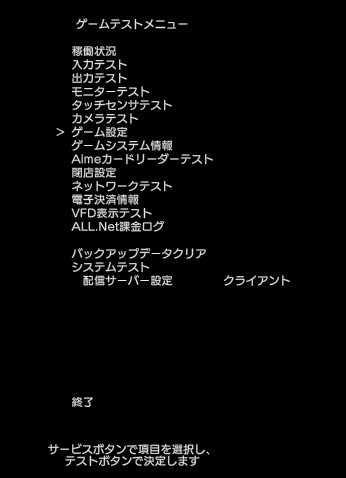
Select 店内マッチングの設定 (IN-STORE MATCHING SETUP, the first option)
and toggle this setting to OFF.

Select 終了 (EXIT, the last option) to exit to the main service menu.
You're all done! The game should load up properly now
You can add coins using the Coin key (default F3) and card in by holding the Enter key
Help
Something's wrong?
Make sure you've followed all steps correctly and also read other relevant guides.
Still stuck? You can join our Discord community server for support!
Click on the Discord logo at the bottom right of the page.