![]()
Controllers
You must obtain clean, unmodified and complete data to proceed with our guides
Corrupted or incomplete files will cause unpredictable issues we can't cover.
TWO-TORIAL does not provide or distribute game data. Do not ask.
segatools, by default, only accepts keyboard input and does not recognize any controllers. However, it can be configured with IO DLLs to add support for controllers.
The controller you plan on using should also be provided with these IO DLLs. If unsure, check the support section for your controller, or contact the vendor directly. Alternate options for the most common controllers are listed below.
These IO DLLs should be copied to your game's App\bin\ folder and referenced in
segatools.ini under the [chuniio] section.
If you have a single DLL, uncomment the path= line by removing the leading semicolon (;),
then add your DLL's file name after the =:
[chuniio]
; Uncomment this if you have custom chuniio implementation comprised of a single 32bit DLL.
; (will use chu2to3 engine internally)
;(1)!
path=controller.dll
- Note that there is no leading semicolon.
If you have two DLLs, ending in _x86.dll and _x64.dll (or _chusan.dll and _amdaemon.dll),
uncomment the path32= and path64= lines by removing the leading semicolon (;), then
add your DLLs after the =:
[chuniio]
; Uncomment both of these if you have custom chuniio implementation comprised of two DLLs.
; x86 chuniio to path32, x64 to path64. Both are necessary.
;(1)!
path32=controller_x86.dll
path64=controller_x64.dll
- Note that there is no leading semicolon.
Keyboard
Keyboard is the default input method, and while not recommended for playing the game, it is useful for testing purposes.
The default layout uses SDFGHJKL for slider input, and Space Bar for the AIRs.
If you wish to change the default keybinds, an explanation on how to set these is included
above the [io3] section in your segatools.ini.
Brokenithm
Brokenithm allows you to use a mobile device as a CHUNITHM controller. It uses the bottom half of the screen as the ground slider, and sliding into the upper half activates the air sensors.
Android
Warning
Your computer and your Android device must be on the same local network.
- Download the latest version of Brokenithm-Android and install it on your Android device.
- Download the latest version of Brokenithm-Android-Server
and extract only
brokenithm_server.exeto yourApp\bin\folder. - Download the latest version of Brokenithm-Evolved IO DLLs and extract the DLL files to your
App\bin\folder. - Edit your
App\bin\segatools.inito reference the extracted DLLs:
- Run
brokenithm_server.exe. A command prompt window should open, saying that it is waiting for a device on port 52468. - Open the Brokenithm app on your Android device. Enter your computer's IP address in the Address box on the top right, then tap Start.
- Run the game as normal.
Getting your computer's IP address
Open Settings -> Network and Internet and select Properties. Scroll down to the bottom and check the address under the IPv4 address field:
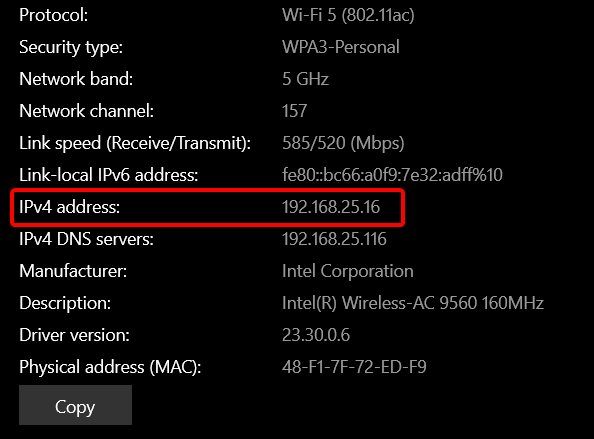
That is your computer's IP address.
Automatically launching the Brokenithm server when starting the game
This will only work if you extracted brokenithm_server.exe to App\bin\ as previously instructed.
You can edit the launch script to launch the Brokenithm server when starting the game.
Edit App\bin\launch.bat to add a line above the existing commands:
@echo off

pushd %~dp0

start /min brokenithm_server
start /min inject_x64 -d -k chusanhook_x64.dll amdaemon.exe -c config_common.json config_server.json config_client.json config_cvt.json config_sp.json config_hook.json
inject_x86 -d -k chusanhook_x86.dll chusanApp.exe
taskkill /f /im amdaemon.exe > nul 2>&1

echo.
echo Game processes have terminated
pause
Improving latency
You can improve latency by running Brokenithm with your Android device tethered to your computer. However, this requires a little extra setup:
- Connect your Android device to your computer with a USB cable.
- If you haven't enabled Developer options on your device, do it by navigating to the "About" page in your phone's settings, then tap "Build number" seven times. This varies by device, so if unsure, look up the instructions for your specific one.
- Navigate to Developer options and enable USB debugging.
- On your computer, download and extract Android SDK Platform Tools
to your
App\bin\folder. - Navigate to the
App\bin\platform-toolsfolder in File Explorer, click on the address bar, typecmd, and hit Enter to open a command prompt. - In the command prompt, type the following command:
- Start brokenithm_server in TCP mode with the -T command line flag,
brokenithm_server.exe -T. - On your Android device, open Brokenithm, and change the address to
0.0.0.0.- If the text box to the left of the "SETTINGS" button say "UDP", tap on it once to switch to "TCP" mode.
- Tap on "START", and you will now be connected via the USB cable.
- You can now start the game as normal.
The next time you play the game, you only need to run the adb reverse ... command
again. To do this automatically when the game starts, add a line to the launch.bat
script before the brokenithm_server line:
@echo off

pushd %~dp0

start /min platform-tools\adb reverse tcp:52468 tcp:52468
start /min brokenithm_server -T
start /min inject_x64 -d -k chusanhook_x64.dll amdaemon.exe -c config_common.json config_server.json config_client.json config_cvt.json config_sp.json config_hook.json
inject_x86 -d -k chusanhook_x86.dll chusanApp.exe
taskkill /f /im amdaemon.exe > nul 2>&1

echo.
echo Game processes have terminated
pause
iOS/iPadOS
- Install Brokenithm on your iOS/iPadOS device by joining the Brokenithm TestFlight (iOS 18 only).
- If your iOS/iPadOS device doesn't have iOS 18, you will need to sideload a different IPA with Sideloadly.
- If you have iTunes and/or iCloud installed from the Microsoft Store on your computer, uninstall it.
- Install the non-Microsoft Store version of iTunes from the website.
- Download the latest version of Brokenithm-Evolved-iOS server
and extract it to
App\bin\Brokenithm-Server. - Download the latest version of Brokenithm-Evolved IO DLLs and extract the DLL files to your
App\bin\folder. - Edit your
App\bin\segatools.inito reference the extracted DLLs:
- Run
App\bin\Brokenithm-Server\Brokenithm-Evolved-iOS.exe. A command prompt window should open, saying that it is waiting for a device. - On your iOS/iPadOS device, open Brokenithm, and connect it to your computer with a USB cable.
- Run the game as normal.
Automatically launching the Brokenithm server when starting the game
This will only work if you extracted the server to App\bin\Brokenithm-Server as previously instructed.
You can edit the launch script to launch the Brokenithm server when starting the game.
Edit App\bin\launch.bat to add a line above the existing commands:
@echo off

pushd %~dp0

start /min Brokenithm-Server\Brokenithm-Evolved-iOS.exe
start /min inject_x64 -d -k chusanhook_x64.dll amdaemon.exe -c config_common.json config_server.json config_client.json config_cvt.json config_sp.json config_hook.json
inject_x86 -d -k chusanhook_x86.dll chusanApp.exe
taskkill /f /im amdaemon.exe > nul 2>&1

echo.
echo Game processes have terminated
pause
TASOLLER
Warning
This guide only covers TASOLLERs running the v2.0 touch firmware. If you've purchased the controller after January 2022, the update should have already been applied.
If you've purchased the controller before then, you will need to update the touch firmware by following the instructions on DJ-DAO's support page.
- Install the custom IO4 firmware to your controller.
- Follow the
segatools.iniconfig on the gitea page. - Connect the controller to your computer, and then start the game.
Legacy
- Backup TASOLLER setup if IO4 cfw is not working.
- Install the custom Host and LED firmware to your controller. Instructions on how to do so is provided in the linked archive.
- Download TASOLLER IO DLLs and extract to your
App\binfolder.- chuniio-rs (download
chusan.zip)
- chuniio-rs (download
- Edit your
App\bin\segatools.inito reference the extracted DLLs:
- Connect the controller to your computer, and then start the game.
TASOLLER PLUS
- Switch your TASOLLER PLUS to WINUSB mode. You can do so in TASOLLER Options found on the djdao support page.
- Download TASOLLER PLUS IO DLLs and extract to your
App\binfolder.- chuniio-rs (download
chusan.zip)
- chuniio-rs (download
- Edit your
App\bin\segatools.inito reference the extracted DLLs:
- Connect the controller to your computer, and then start the game.
YubiDeck
- Switch your YubiDeck to HID output mode. Instructions on how to do so are provided in the YubiDeck manual.
- Download the latest version of YubiDeck IO DLLs
and extract it to your
App\binfolder. - Edit your
App\bin\segatools.inito reference the extracted DLLs:
- Optionally, reference the included AimeIO DLL to use the controller's built-in card reader:
- Connect the controller to your computer, and then start the game.
Laverita 3
- Switch your Laverita to IO mode. You can do so in ConfigApp found in the yuancon discord.
- Change the COM port of your controller. You can do so in
Device manager by looking for
USB Serial Deviceyou may need to unplug and replug your controller to properly idetify which one is the Laverita. - Double click on it
- Go to Port Settings
- Click on Advanced
- From the dropdown select COM1
- Restart to ensure changes took effect and saved
- Edit your
App\bin\segatools.inito disable io emulation and set led:
[led]
; Output billboard LED strip data to a named pipe called "\\.\pipe\chuni_led"
cabLedOutputPipe=0
; Output billboard LED strip data to serial
cabLedOutputSerial=1

; Output slider LED data to the named pipe
controllerLedOutputPipe=0
; Output slider LED data to the serial port
controllerLedOutputSerial=1
; Use the OpeNITHM protocol for serial LED output
controllerLedOutputOpeNITHM=0

; Serial port to send data to if using serial output. Default is COM5.
serialPort=COM1
; Baud rate for serial data (set to 115200 if using OpeNITHM)
serialBaud=9600

[slider]
; Enable slider emulation. If you have real AC slider, set this to 0.
; Slider serial port must be COM1.
enable=0

[io4]
enable=0
- Then start the game.
Legacy
- Backup Laverita 3 setup if IO4 mode is not working.
- Switch your Laverita to HID mode. You can do so in ConfigApp
- Download Laverita IO DLLs and extract to your
App\binfolder.- chuniio-rs (download
chusan.zip)
- chuniio-rs (download
- Edit your
App\bin\segatools.inito reference the extracted DLLs:
- Connect the controller to your computer, and then start the game.
Arcade hardware and other controllers
If you're interested in using a cabinet slider and air sensors, or possibly even making your own controller, the Cons&Stuff website and Discord community is a great place to start!